Saturday, December 31, 2016

Jane Austin Thanks Card

I cannot even explain my excitement right now!! This is my very first EVER post as a Design Team member!!! (I think I can fit a couple more Exclamation Points on there!) !!!!

So I'm keeping this post simple to make sure I do everything correctly! Please visit Sketch Saturday to see the great card sketch they have for this week, check out the work of our fabulous Design Team, and of course link-up your own work!

For this week's card, I chose to flip the sketch on on its side! (Yes, you CAN do that--brilliant, right??) I needed a classy Thank you card for my Aunt who hosted a HUGE family get-together in her home for Christmas, but I just wasn't feeling anything too girly. This sketch lent itself quite well to the task!


The banner sentiment is raised on foam dimensional tape, and of course, inked with Vintage Photo Distress Ink. I added the 3 metal brads from my stash, and used my homemade bow-maker to create a double bow of jute-thread to tuck under the top-most brad. (Please notice that the washi tape I used to hold the sentiment-strip down while working on it, damaged the paper a little when I went to remove it, but I actually think it just adds to the aged and weathered look!)


We really DID sit on the fireplace hearth at the party, so I thought this sentiment was perfect. I ran my Hobby Lobby Ivory Heavy Cardstock through the printer so I could make a sentiment that I didn't have in a stamp.


Thanks for looking and don't forget to check out Sketch Saturday!

AND HAVE A SAFE AND FABULOUS NEW YEARS!!

Wednesday, December 28, 2016

Scrapped Hello

I started paper-crafting with Scrapbooking. And have found that I end up with a lot of scrap pieces of pretty paper that I just hate to waste. So I have taken up cardmaking in an effort to put those pieces to good use. Therefore, here again is a scrap-work card for your review!


I love this border paper of butterflies and matched it with these other paper pieces. The card stock was full sheets.

The brown patterned paper was cut to 4-1/2x6", then framed with a brown and a pale pink--the brown at 1/4" larger than the patterned paper, and the pink 1/8" larger than that.
The butterfly border was already 1- 1/8" tall, then shadowed by a brown at 1/8" taller than that. Both cut to 4-3/4"  wide. The narrow strip of pink was already 1-1/2" tall, and then cut to 4-3/4" wide: the three layers of paper attached across the bottom 1/3rd of the brown patterned paper.


"Hello" was stamped on Hobby Lobby heavy weight ivory card stock, with brown Versafine ink, and embossed with clear powder. The sentiment piece was then die-cut with the Cuttlebug--and then cut in half so it could "hang" at the top of the card. I didn't like how stark it looked, so inked up the edges with Walnut Distress ink.


I chose to print the inside sentiment on the same ivory card stock. Once cut, the card cover left an 1/8" border of ivory around the outside, just to give it some more depth.

To finish off the card I added a small metal butterfly charm with 1/8" wide ivory ribbon.


Thursday, October 6, 2016

Witch or Treat Card

I have been consumed with making "Trick or Treat" Halloween Cards lately. That's the theme for one of my groups, and another requested a card with a Witch (or a ghost). So for this card I decided to cover both themes in one!


The Digital Stamp was a whopping $1 at TiddlyInk.com--and gosh she's so darn cute! I'm not super great at all the shading and coloring, but I still enjoy using my Copics and Spectrum Noir markers to make these bold and adorable designs.


I also used a Yellow Wink of Stella pen for the wisps of "magic" coming from her wand, on the buckle of her shoe, and as highlights in her hair. Somehow it just didn't look "finished" until I added the light gray outline on her: that little touch seems to make her image pop on the paper a bit.


  I chose to use a black card stock base for the card in my favorite size of 5" x 6.5". The polka-dot patterned paper (from the Paper Studio All Seasons II paper pack) was then cut to 4.75" x 6.25".


My Witch block was cut at 3.75" x 5.25" and I used the Perfect Layers tool to cut the frame to 1/8", from plain black card stock. The Trick or Treat at the bottom of the panel is just from the Bargin Bin at Michaels, which I un-mounted and used in my MISTI with Versafine Black ink, and Recollections Clear Embossing powder.

I didn't want the ribbon to go across her legs, but I loved the look of this bow. So I punched a hole in the panel and ran my ribbon through it, so it would go behind her legs, and over the panel on the left side. I found it easier to do this with a single ribbon and adhere both ends to the back side of the pattern paper, rather than using 2 pieces and tying them together. Before actually attaching the ribbon to the pattern paper, I did use foam tape to make the panel lift off the paper slightly. Once those pieces were attached, I could glue down the ribbon on the back of the pattern paper, and adhere the whole piece to my black card base.

Having it attached to the base made it easier to mess with the bow, which I tied directly to the ribbon: I only tied the bow, I did not start with the over-hand knot so it wouldn't be quite as thick. I really like the way this ribbon has glitter that flakes off and puts just the tiniest bit of glitter onto the paper!


Because the Card Base is black, I attached a white insert to the inside which measures 4.75" x 6.25" (or maybe 1/8" bigger, depending on my mood!) I used another Bargain Bin stamp and Versafine Black ink to stamp the Happy Halloween sentiment on the insert.


I also stamped my Artist Stamp onto a scrap piece of white card stock, cut it with decorative framelit and attached it to the back of the card with Tombow Mono Liquid Glue.


Thanks for looking!


Sunday, September 25, 2016

Live the Sweet Life

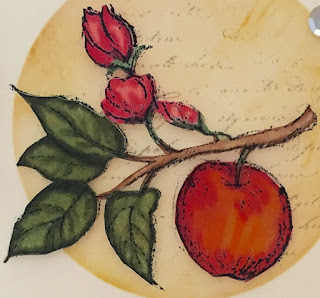
This sweet little card (see what I did there?) was made for my September Apple themed Swap.

I had a vision for this card, and was lucky enough to find an older Close To My Heart stamp set called Sweet Life that matched perfectly with my idea.

The card base is made of Recollections cream card stock. I used an Inkadinkado masking sheet, with a circle die to create a mask on the card base. I used my new tear-drop sponges with Hello Honey, then just a bit of Calypso Coral Stampin Up inks. I used my background script stamp, with Soft Suede ink with a second-generation stamping to keep it from being too bright.

I then removed the mask and stamped the apple branch with Memento Black ink. Using my MISTI to help keep things straight, I stamped my sentiment with Versafine brown ink, and embossed with clear powder.

I then stamped the same apple branch with black Memento ink on more of the same cream card stock. I then used a combination of Copic and Spectrum Noir markers to color the image. **I have found that I personally like the Copics better--they seem to blend better and bleed less for me, but I already have a pretty good collection of Spectrum Noir markers, and can only add to my Copics as I can afford them, and of course with a great discount coupon!** A Hint I learned from Jennifer McGuire: After I cut the image out, I went around the edges with the matching color marker to cover any white spots showing through so it looked like it was perfectly cut--which of course, it was not! ha ha

Then, because I do not YET have a Scan N Cut, I fussy cut the colored apple branch. (SO getting an SNC as soon as possible!)

I placed the cut branch on foam tape (lots of foam tape!) and placed it right over the one stamped on the front of the card base.

I finished off the card with some brown baker's twine, and some matte metalic sequins. These sequins were from Hobby Lobby and somehow I just LOVE the matte look of them!

Wednesday, September 14, 2016

Believe in Miracles


I have failed to keep up on my blog for a bit. I’m so sorry, friends! I have found that I have a new addiction: Quilting! It has drawn my attention for a while, so the only card-making and scrapbooking I’ve been doing has been what was needed for my own obligations or customers. But I’m glad to be back, just managing my time a little better!

As I get back in the swing of things, I found the My Favorite Things blog, and made this simple card for this week’s sketch challenge.

I started with a base of Refelctions Ivory Card Stock, cut at 4 ¼ inch vertically, then folded at 5 ½.


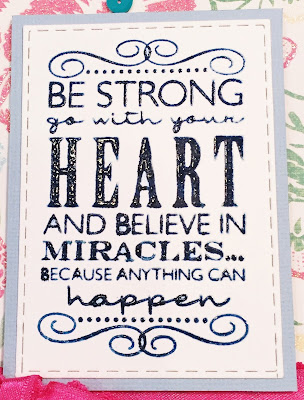
I have been thinking about making a card where the sentiment is the main focus of the card, and this seemed like the perfect opportunity! I have had this stamp for some time, and unsure who the maker is. 


 To stamp it, I used my MISTI and Pacific Point Stampin Up ink, on Reflections Ivory cardstock. Then I wiped the stamp off and used Versamark ink and clear embossing powder. Unfortunately, the stamp didn’t make a clean impression, so I used Reflections Masterpiece II Markers, in Cadet Blue to fill in the missed spots and put it back in the embossing powder. Then used a Gelly Roll White pen to fill in the center of some letters that had bled over. Looks much better!


To cut the sentiment out, I used my stitched rectangle dies. However, the one that fit the best for the width, was too long and left more empty space than I wanted. So I used a technique I learned from the FABULOUS Jennifer McGuire to adjust the size of the die. This meant letting the end of the die hang over the bottom cutting plate as I ran it through the Cuttlebug. Then moved the die up to where I wanted to cut the edge off the bottom, placed JUST that portion (the uncut portion) onto the bottom cutting plate and ran it through the Cuttlebug again. It turned out PERFECT!!


Then I placed this rectangle on a piece of scrap aqua-paper and used the Mini Perfect Layers to cut the edges off at 1/8th inch.

Likewise, the background paper was a scrap that I picked up at a crop-swap, so unknown maker. As you may have noticed, I enjoy using scrap papers for my cards! I cut the patterned paper to 3 ¾ by 5 inches and placed on a teal base from Bazzil card stock, a quarter of an inch bigger.

The sentiment piece was placed with foam tape. I prefer to use a lot of dimensional to make sure the piece makes it through the mail unscathed. To do that, I use 3M ½" foam tape, then using my rotary cutter, I split it into 3 pieces. 6 of these narrow strips hold the sentiment form to the card base.

To finish off the cover, I used 3 sequins from the Kat Scrappiness Go Green collection, placed randomly around the base with mini Glue-Dots. The pink ribbon set off the color of peony in the corner very well! I usually tie my bows around the ribbon, but I wanted this ribbon to be up under the frame piece, so I tied the bow on my bow-jig then attached it where I wanted using a Glue-Dot. The final touch was to stamp “Believe” on the inside, using Memento Tuxedo Black, off center to keep it whimsical. This stamp is from the Vintage Affections set from Little Darlings Rubber Stamps.


What a great “Encouragement” card!!

Thursday, May 26, 2016

Belated Balloon Bouquet


This used the Stampin Up Balloon Celebration stamp set using the technique of Masking. 

I set down the strings first, using VersaFine Black ink on Recollections Heavy White Card Stock.

I used the MISTI to help place the balloons, starting with the Ruby Red balloon, followed by the Summer Sun balloons. I cut a mask for the large and small balloons out of Post-it notes. Then, covering the large yellow balloon, I did the large Brilliant Blue, then the Wild Wasabi.

Of course the small blue balloon I didn't get in there quite right, and this is because I was overly cautious when cutting and placing my masks on the yellow and green balloons.  Please remember to cut right on the line or possibly JUST to the inside, when cutting your masks.

The sentiment was stamped with VersaFine Black and heat embossed with clear Recollections embossing powder. 

I then cut this panel, and the brilliant blue frame from a scrap of card stock, using some great dies from Gina Marie! The white piece was then fit into the blue frame and taped with plain ol' scotch tape on the back. The other pieces--the blue center and white frame are saved in the scrap drawer, btw!

For the ribbon, I punched a small hole about half way between the strings and the outside of the white panel. The yellow ribbon goes behind the frame set on the right and over it on the left, with the right side coming up through the whole. This is a Yellow 365 ribbon from Michaels--lots of ribbon for a very low price!

To really make the scene pop, I cut the red base at 4.75 x 6.25, leaving the quarter inch of white showing in the card base.

I chose to not to any dimensionals on this card for cheaper mailing. 


The clean, simple interior sentiment is also done with Black VersaFine.

Thanks for looking!


Friday, March 25, 2016

Air Mail Sympathy Card

I FINALLY got a chance to use one of my Sale-A-Bration stamps! I love this bi-plane, but have been busy making Easter Cards and couldn't use it until I received an order for a Masculine Sympathy card. This seemed like the perfect opportunity to put this adorable Bi-Plane to use.


The base is 6.5 x 5 inch pre-cut craft paper base from Hobby Lobby. Both the dark brown outer frame, and the cream cardstock with the sentiment are open stock from HL--I did use the less textured side of the cream for easier stamping. I chose a brown baker's twine from the Michael's bargain bins. The distressing around the layers is all down with Distress Ink Walnut Stain.

I used my MISTI for the stamping so I could go over it a couple of times and ensure that it would all be straight. The Sentiment is from Stampin Up "Petite Pairs", and was inked with SU Chocolate Chip. The bi-plane is from Stampin Up "Sky is the Limit" from the Sale-A-Bration specials and was inked with VersaFine Brown and heat embossed with Recollections Clear Embossing Powder.

The bi-plane really stands out, as it is on 2 layers of foam. The first is fun-foam, cut out exactly to match and glued to the back of the cut out plane, both of which I fussy-cut. The second layer was done with foam tape, so I could leave space for the string.

The striped pattern paper is a My Minds Eye that has been in my stash for some time.


At first I wasn't going to add a panel to the inside, but silly me, I stamped the sentiment the wrong direction! But I think the panel really added to the overall effect! The sentiment is also from the Petite Pairs collection and inked with Chocolate Chip. I love the way the distressed edges really make this paper look aged. Since this was a small sentiment for the size of the card (as chosen by the client), I decided to put it more the bottom right hand corner...I felt it would look lost in the middle of the card.

I really like the way this came out looking like an old-time package being air-mailed! Since this was for a man, I knew I didn't want any flowers or bling. All together, I think it looks just as "finished" as others that have all those extras.

Thanks for checking it out!

Friday, February 26, 2016

Large Yellow Ribbon Sketch Card Challenge

Just a quick little post today, for the Paper Play Sketches Card Challenge. Visit their blog to see their other entries and the original sketch!


The patterned paper was out of my scrap box, and the stamp is from my collection of older Stampin' Up! stamps. I stamped it with Certainly Celery, then used my Spectrum Noir markers to color in the little flowers.

The stitched rectangle is a Gina Marie.

This ribbon is 1.5" wide--the widest I've ever used on a card! But I think it turned out cute!

Monday, February 22, 2016

Spring 2-Step


Today I felt like continuing with the bright cheery colors, and had so enjoyed the yellow ribbon on the Sunburst Card, that I wanted to use it again as well.  These 2-Step flower stamps are from Stampin’ Up! and have been in my stash for a long time, but have never been used—until now!


I prefer Stampin' Up Inks for my color stamping, but most of my collection of stamp pads are older and retired. For my base colors, I used Summer Sun (closest to Daffodil Delight in the current collection), Pretty in Pink (Pink Pirouette) and Pale Plum (Wisteria Wonder). The secondary stamp, the darker inks are Hello Honey, Regal Rose (Melon Mambo) and Lovely Lilac (Perfect Plum). The lighter green stems are Certainly Celery (Pear Pizzazz) and the leaves are Wild Wasabi.

 I cut a base on Heavy White Recollections cardstock at 6.25" by 4.75", and cut a piece of scrap to 1.75" by 4.75" (I could've left it wider, but this was the extra off the original cut, so 4.75 will be just fine.) I lined these up in my MISTI with the scrap as a mask at the bottom of the white base.


For the background colors, I used my MISTI, and inked each stamp a couple of times to get a nice bright impression. I had separated the flowers from the stems, so I could ink those individually, and the MISTI made this process easier as well.


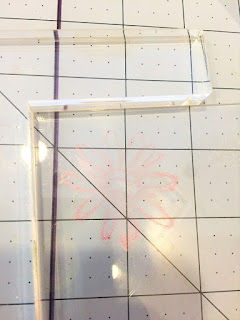
For the second step of the stamps, I used my Stamp Position-er. Now that I know how useful this tool is, I will definitely be upgrading to the Stampin' Up! Stamp-A-Ma-Jig!  You just place the plastic sheet over your project, line up the stamp-block in the corner of the positioner and make an impression.


Then you use the clear plastic sheet to line up exactly where you want the stamp, place the positioner, and remove the plastic sheet. Then when you line up your stamp again with the positioner, it stamps right where you already decided you want the stamp!


Now on this set of stamps, its not quite as important, because they're of an abstract nature. But I'm so OCD that I got frustrated trying to do this without the Positioner. TIP: I did find that I might accidentally move the base when removing the plastic sheet, so I used a bit of Washi tape to hold my base piece in place.  I free-hand stamped the little leaves.


 It was back to the MISTI for the sentiments to make sure everything was straight and well inked. Heat embossed the outside sentiment with clear embossing powder, but did not emboss the interior message.

I felt the card needed more color, so I used Ballet Blue (Sky Blue) to distress the edges of my base. And of course added my beloved yellow silk ribbon. I have also found that sequins cover a myriad of sins! So, one to cover an ink blotch and 2 more to make it look intentional! :-)


Did a second-impression Butterfly (meaning I stamped once on a scrap paper, then into my card) with Ballet Blue in the upper corner to add interest to the inside!

And I still didn't feel it was quite done, so I put a little bit of Wink of Stella in the center of the pink flower.


I am really loving these spring colors! This is my favorite season of the year!!