Saturday, October 28, 2017

Elegant Birthday Card for my Bestie

When I realized that my BFF's Birthday was coming up, I knew I couldn't just send her one of the cards from my stash! Bestie's deserve extra special cards!!

I'd purchased this gorgeous stamp set from a company whose name I promptly forgot! I used VersaMark to stamp the 2 parts of the image on the top and the bottom of a 5" x 6.5" white panel, then heat embossed with gold.

I used my sponge blenders to apply Dusty Concord Distressed ink, followed by Island Indigo and Taken with Teal Stampin Up inks.The purple is hard to see in the pictures, but is at the top left and the lower right. The Taken with Teal is mostly in the middle area with the lightest area being where I wanted to put my sentiment.

The sentiment is from Taylored Expressions, and was also done with VersaMark and Gold embossing powder. It seemed like there was just too much open space in the middle, so I took my Ranger Clear Embossing Pen and put some dots around where it seemed appropriate and embossed those as well.


I cut the panel to 4.75" x 6.25" and then cut a new panel to the original size. The edges of this new base panel were embossed with the VersaMark and gold embossing powder so it matched the design perfectly! I mounted the colored panel on Fun-foam then onto the gold-edged base panel, all adhered onto a white card-base.

Then I opened the card and realized it was way to plain!! So the sentiment was also Gold Embossed, with just the top portion of the smaller frame piece being embossed along the bottom. I used the same colors to add a lighter blending to the bottom of the inside of the card!


I wanted to decorate the envelope to match but the frame wasn't wide enough to cover the whole of the envelope on the wide side. So I fussed with inking all but the last portion, then moved the stamp and inked the last portion and a little more to fill the full width. To make the break seem not as obvious, I used my Embossing Pen again to add some dots and a flourish. And of course the same process of color blending on the envelope! I addressed the envelope using a Gold Uniball pen....before I remembered to take a picture of it. So, I'm not going to show it--but it was lovely!

Thanks so much for checking out my work and I'll hope to have you visit again soon!


Wednesday, October 25, 2017

Monochromatic Scrap-Card


One of my scrap drawers was so overflowing that I couldn't close it any more! So I had to make some scrap cards! One of the designs I came up with was inspired by this MayMay Made It YouTube video. There are lots of other similar designs around on Pinterest.


 I had also seen this video from Jennifer McGuire, and made some Rainbow Cards with a slightly different design.  On these cards, I die-cut the word "hello" 4 times from black scraps then topped it with Accent Essentials. The Friend stamp was stamped with VersaFine Black and heat embossed with clear powder.  This design requires more long pieces.


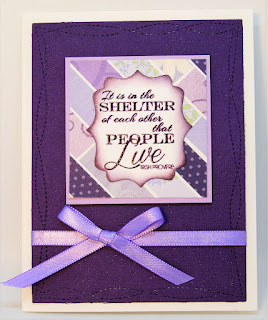
When I finished 4 of the Purple Monochromatic cards, I still had a few smaller pieces left over, which I couldn't stand to throw away. So I cut a piece of 2.5 x2.5 inch white square and did the same mosaic design on this smaller piece.  I cut a dark purple background with the wonky-stitch rectangle. The sentiment piece was distressed with Perfect Plum, which just made it stand out better. Even though this card was actually just to use up the last little pieces, and was a total after-thought, I think this one ended up being my favorite! LOL


I was working to make a bunch of "hang-in there" style cards, so I just printed this sentiment on my 8.5" x 11" card stock numerous times and cut in half to make my card bases. I ended up with 8 of the Rainbow cards, and 5 of the Purple monochromatic cards.


I decided to participate in some Challenges this week, so I am linking to all the blogs that these cards work for. Thanks so much for visiting and I hope to you'll be back again soon!


Saturday, October 21, 2017

Live, Laugh, Love Autumn Greetings


These cute Kitties are from Digi Stamp Boutique--they're called Olivia and Archie! They are so stinkin adorable! I wanted to make them fall, so my colors are all in that mind set. The card design is for Sketch # 486 on the Saturday Sketch Challenge.
The coloring was pretty simple for most of it--I just used my Copic Markers. For the leaves, I knew I wanted this vague color pattern. So I used the "smooshing method" where I rubbed some Distress Inks onto an acrylic block, sprayed it with water then smooshed the block onto water paper. Rather than fussing with trying to get the thick water color paper to go through my printer, I simply cut the leaf-bunches off one of my extra print-outs then used that as a template to cut out the colored pieces of water-color paper.

I ended up with extra of the colored water-color paper, so used a die-cut to cut out the little leaves to use as the corner embellishment, along with some thick thread.  The background paper, and the sentiment are both from a super cute paper pad that I found in the Hot Buy section at Michaels! 

Of course, all the edges were distressed with Linen or Vintage Photo Distress Ink.


Thank you so much for stopping by! And as always, please visit Sketch Saturday Challenge Blog to see what the other gals came up with!


Sunday, October 15, 2017

Witchy Halloween Card

 This adorable image is called Witchy Emma from ScrapN Dipity designs. The paper strips are all from my scraps!


I colored her with my Copic Markers, adding a little bit of yellow Wink of Stella  as accent on her hair.  I used some Yellow Stickles on her wand. Then flicked some black ink so that it didn't look quite so stark.


The inside is stamped with an ornate sentiment from Michaels' Dollar Bin last season, using Memento Black, since I didn't plan to emboss it.


Thanks for stopping by and please head over to the ScrapNDipity Challenge Blog to see what the other designers created for the October 15th challenge!

Saturday, October 7, 2017

Enchanted Wishes from the Deep


Today is Sketch #484 on the Sketch Saturday Challenge blog which is similar to a previous sketch, in that it has 3 circles. For the previous sketch I made the mistake of feeling like I needed to make sure the circles were incorporated in my design. This time, I allowed the stamp-images to represent the circles in the sketch, and I like the result ever so much better!

I purchased two new "hot" items for this design and want to give a short review of each as well.

1) Distress Oxide inks: 5 stars! I used these for the background to make the water. They were vibrant and easy to blend--as advertised! I think adding the water sprinkles really added to the effect.  I used Cracked China over the whole back ground, then Salty Ocean for a small strip on the left, and the majority of the right--thus creating a lighter area near the left to represent the strip in the sketch, and to look like a ray of sun filtering through the water.

2) Claritystamp Brushes: 3 stars. I had a hard time getting these to do more than a VERY subtle background. For this project I ended up using my foam blenders instead. I did use the Clarity Brushes for another project--a simple masked hill and sky scene, and they worked fairly well for that, as I DID what the sky to be subtle. But they still left brush marks more than I had expected. They just aren't the "magic blending tool" that I felt people were saying they were. Still good, but definitely not great--I think I'm going to try the Nuvo brushes as they look like they might be more useful to me with their more snub-ends. They currently seem to be sold out EVERYWHERE, but I'll let you know what I think once I can get my hands on them!


These adorable images are from Drawn with Character. The Baby Mermaid set comes with both a boy and a girl, which is so fun!


And the Baby Sea Creatures set comes with 6 super-cute little animals plus some bubbles.  I had a really hard time choosing which creatures to use for this!!


I printed all my images on Paper Studios Heavy Weight card stock. This paper is thicker than their standard card stock but not as thick as the Michael's HW--which doesn't like to process through my printer.


 I also like this weight for my card bases, as it again is thick, but not too much so. I chose to just print a bunch of the images randomly on a page and practice coloring, then fussy cut the ones that I liked the best. These were all colored with Copics and highlighted with some Wink of Stella. I glued the cut images to the background using Ranger Multi-Medium Matte.

The sentiment is from LLDS "Vintage Sentiments"; stamped with a white ink and heat embossed with a Pearl embossing powder.

To finish off the card, I added a few drops of Accent Essentials to look like bubbles. I did leave the inside of the card blank so I can add a sentiment later that is specific for the recipient.

Thanks for visiting and as always, don't forget to go over to Sketch Saturday and see what the other DT Girls came up with!!


Monday, October 2, 2017

Over the Moon for You!


Today, I'm playing along with the My Favorite Things Sketch Challenge again. As soon as I saw this design, I knew I wanted to use it and that I wanted to make the circle a "moon" of some sort! 

 I did make the circle much smaller than in the image, and my line across the back is very subtle--just a lighter shade in the Universe background. And obviously I did not include the center rectangle.


The images are colored with Copics, then fussy cut. I loved the look of the white gel-pen accents on the helmet to make it look like it was glass!


The fun thing about this card: The Astronaut moves!

He has just a little bit of movement all around. I saw this technique in a Jennifer McGuire  YouTube video--thank you Jennifer McGuire!


I tethered the astronaut to his space-ship with a piece of white crochet thread. This keeps him from flipping around TOO much!


My design only loosely follows the sketch, but I was definitely INSPIRED by the Sketch! I hope that counts! LOL Thanks so much for visiting, and I would love to hear from you!